A theme is what defines the way the Moodle engine displays all of your Moodle powered pages. Themes are easy to create and allow you to personalize Moodle for your class, school, or school district. Themes consist of a Cascading Style Sheet (CSS) file and a few images. The simplest way to create a custom theme for your school is to modify the CSS and images of an existing theme. This tutorial will walk you through creating a custom theme based on the default Moodle theme which comes with version 1.9 of Moodle. Note that some additional color schemes are already included, and one of those may already fit your needs; be sure to check.
Requirements
In order to edit your theme, you'll need to have all of the following:
- An installation of Moodle 1.9 or greater
- Access to the server where Moodle is hosted (talk to your network administrator)
- (If your access is over FTP or SSH) A transfer program, such as the free program FileZilla
- A text editor (Windows comes with one by default, but others like Notepad++ or TextWrangler (Mac) make editing much easier)
Get your new Theme setup
First, login to your Moodle server, and navigate to the "/theme" directory inside the main Moodle directory. Copy the folder named "/standard" to an appropriate name for your new theme (avoid spaces or capital letters, e.g. "schoolname"). This will appear as the name of your theme inside the Moodle configuration.
If you do not have direct access to the server (e.g. you are working from your own computer) use your file transfer program to download a copy of this folder to your desktop and rename it there.
Start from scratch or use a parent theme?
You can now start to alter the features of the theme you have just copied, or choose to set it to use another theme as the parent, in which case your theme will use the parent theme's styles as a base, plus any changes you make. This is better than copying the entire folder of that theme and changing it, as sometimes the developers will make changes to the original theme to keep up with new Moodle features. These changes will not be included if you take the whole folder and alter it, but using another theme as a parent means that that original theme will be unchanged and will be updated when you update the rest of Moodle, avoiding messy surprises.
Use code like this in /theme/yourtheme/config.php
$THEME->sheets = array('user_styles');
$THEME->standardsheets = array('styles_layout');
$THEME->parent = 'custom_corners';  // put the name of the theme folder you want to use as parent here.
$THEME->parentsheets = array('user_styles');
you then lose all .css files except user_styles.css, which should be empty, where you start to add CSS as described below.
Get your colors
In order to configure your theme, you'll need to know what colors you want to use. You should make a note of which colors you want to use, a full list of universally supported colors is available at
[1]. Keep in mind that CSS is an exact language -
DarkGrey will work while
Dark Grey will not.
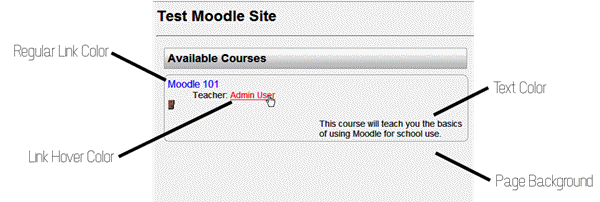
Here's a diagram what you'll need to choose colors for:

Diagram of the Moodle CSS properties.
Best practices for choosing a color scheme is to make your background a light color, your text a dark color, and your link colors something in-between the two. No two colors should ever be the same or a near match. You should also avoid high-contrast colors such as a red background with blue text, which can be incredibly hard to read.
Style the new theme
Now that you have copied the default theme, and chosen the colors for your new theme, it's time to start styling the new page. Open up the 'styles_color.css' file inside the folder you created in the first step inside your text editor. If you wish to use the editor built into Windows, you may access this program by visiting Start > All Programs > Accessories > Notepad.
The following will need to be updated inside of the opened file.
The Regular Link color
Near the top of the file you will see a line which says a:visited {. On the next line you should find the text color:#0000FF;. Erase everything after the colon, but before the semi-colon and replace it with the name of your new link color. The line should now appear as color:YourNewColor;
The Hovered Link color
Eight lines down from where you made your last change you will see a line which reads a:hover {. You'll also see color:#FF0000; on the next line. Like in the last step, change everything after the colon and before the semi-colon to your new color.
The Page Background color
Scroll to where you see a line which says body {. On the next line you should find the text background-color:#FAFAFA;. Erase everything after the colon, but before the semi-colon and replace it with the name of your new background color. The line should now appear as background-color:red;
Now look for the line which reads .sideblock .content { about 1/3 of the way down the page. Two lines below it is a line which reads background-color:#ff0000;. Change everything after the colon and before the semi-colon to the same background color. If you want the sidebar boxes to stand out more, you may wish to change this color to something of the same color, but lighter.
The Text color
On the line below where you changed your last value you will find the regular font color. As with the previous step, replace the #000 with your new color. The line should now read color:YourNewColor;
Remember that while it may be appealing to you to use one of your school colors as the text color, it will probably make it hard for students to read. If you're going to change this from the default black you should chose a very dark shade to replace it with.
At this point you should save this file and close it.
Advanced theming
The hardest part is knowing what CSS to change in order to alter the appearance of a particular element.
Install
Firefox, with the
Web Developer Toolbar. You can now press Shift + CTRL-Y and click something on the page to see what CSS rules apply to it. By putting the same rules into you user_styles.css file with new values, you can change the appearance of that element. CTRL-F will give you information about an elements other properties like ancestors and children.
Adding a Logo
To add a logo to your page, you'll need to get your current logo in a GIF format with a height of no larger than 100 px. If someone from your organization is able to provide this, skip the next section. If not, the following will help you to resize your logo.
Resizing Your Logo
Your logo needs to be in a GIF format with a height of no more than 100 pixels. The simplest way to create this file is to use the web service located at
[2]. Upload your original logo using the upload field and choose Continue. Scroll to Step 2. In the field labelled
Height (Optional) input
100 and chose
Pixels from the drop-down box to the right of it. Scroll to the bottom of the page and change the select box labelled
Save As to read
GIF. Choose
Resize Pic!. Save the result to your hard drive.
Copying the Logo
Copy the 100px logo into the "pix" folder inside your theme folder. Rename it to logo.gif.
Adding the Logo
Back in the main folder for your theme open the file named "header.html" inside of your text editor. You will now need to look for the first ocurrance of the following:
<h1 class="headermain">
Your logo will appear in this location.
Immediately after this code, add the following (assuming you followed the exact instructions for copying and renaming your logo):
<img src="<?php echo $CFG->themewww .'/'. current_theme() ?>/pix/logo.gif" alt="" />This will place a logo on the front school page. If you want a logo on all pages, including teacher pages, repeat this step for the second ocurrance of <h1 class="headermain"> as well.
Theme Display Information
Your theme needs a unique name, otherwise it may not appear in the theme selector. Inside your theme's directory, go into lang/ and then into the directory for your language (for English, go into en/). In each of those directories is a file that should be called theme_THEMENAME.php (for example, if your theme is called "squiddles," the file would be theme_squiddles.php). If THEMENAME isn't your theme's name, rename the file so it is.
Next, open the file. You'll see that it sets several variables related to naming and displaying your theme. The most important is $string['pluginname']. Set this to the name you want your theme to display when a moodle user is selecting themes. It doesn't have to be the same as the theme name in the name of the file (for example, you might call your theme "squiddles" internally, but you could set $string['pluginname'] to "A Squiddles Oceanparty Jamboree"). You can also set the preview image your theme will use in the theme selector.
Finished
If you used a file transfer program to copy the entire folder as detailed in Step One, you should copy the entire folder back into the "theme" folder of your Moodle server. Additionally, change Read and Write permissions (CHMOD) for the files and folder to 755 - Owner read/write/execute, Group read/execute, Everyone read/execute. (In most file transfer programs you can right-click on the folder and choose Properties to do this. In some cases you may need to ask your server administrator to do this for you.)
You can now use your Administrator panel to change your site to the new theme. Choose your new theme from within Moodle via Administration > Appearance > Themes > Theme selector.

Your new theme!
Because of the thousands of HTML elements in Moodle it's impossible to account for every possible change you may want to make to your theme. If you are interested in making more advanced changes, it's recommended you download the
Firefox web browser and install the
Firebug addon to see the HTML structure of Moodle pages. If you do not know CSS, the
CSS Page on W3Schools may be a good starting point.


